Feeds:
Posts
Comments


The Lazy Cook's Pumpkin Pie


Thanksgiving may have come and gone but I couldn’t miss the opportunity to try out America’s most famed Thanksgiving desert – The Pumpkin Pie. Armed with a uk friendly recipe, (albeit the American Pumpkin puree was from Amazon) and an already made pie crust, I completed my laziest recipe to date.

Ingredients

For the pastry
  • sweet short crust pastry case (or a packet of ready made sweet short crust pastry with 40g/1½oz crushed pecans mixed in.)
For the filling
  • 450 g/1lb prepared weight pumpkin flesh, cut into 1in/2.5 cm chunks
  • 2 large eggs plus 1 yolk (use the white for another dish)
  • 3 oz/75g soft dark brown sugar
  • 1 tsp ground cinnamon
  • ½ level teaspoon freshly grated nutmeg
  • ½ tsp ground allspice
  • ½ tsp ground cloves
  • ½ tsp ground ginger
  • 10 fl oz/275 ml double cream

Preparation method

  1. Pre-heat the oven to 180C/350F/Gas 4.
  2. Use a shop bought sweet crust pastry case, about 9 inch/23 cm diameter and 1½ inches/4 cm deep.
  3. Lightly whisk the eggs and extra yolk together in a large bowl.

    Lightly whisk the eggs

  4. Place the sugar, spices and the cream in a pan, bring to simmering point, giving it a whisk to mix everything together. Then pour it over the eggs and whisk it again briefly.

    Blend the spices on the stoveBlend the spice mix and eggs together

  • Now add the pumpkin pureé, still whisking to combine everything thoroughly.

    Blend the pumpkin mix with the rest of the ingredients

  • Pour the filling into your pastry case and bake for 35-40 minutes, by which time it will puff up round the edges but still feel slightly wobbly in the centre.

    Pumpkin pie ready for the oven

  • Remove the pie from the oven and place the tin on a wire cooling rack. Serve chilled (stored loosely covered in foil in the fridge) with some equally chilled créme fraïche, but warm or at room temperature would be fine.

    The finished product

What I thought: ‘Though this recipe was quick and easy to make, its taste didn’t exactly get rave reviews from my taste testers. Overall it felt a little too savoury to be served as a desert and is not something I’ll be rushing to make in a hurry again.’

Happy Baking,

Love,

Miss Trays xxx

Tip top tier

Well it’s been over a week since Will and Kate said ‘I do’ but one of the most exciting events to take place in Great Britain coudn’t go amiss without a batch of celebratory Union Jack cupcakes. Armed with my union jack cupcake cases and flags (£1.00 for 50 The Works) and my cupcake stand (£3.99 The Works), I set about created a masterpiece surely worth a royal mention.

Quick and easy to make, these just require the standard cake mix I have used in previous recipes and accompanied with red icing, to match William’s uniform of course.

Happy Baking,

Love Miss Trays xx

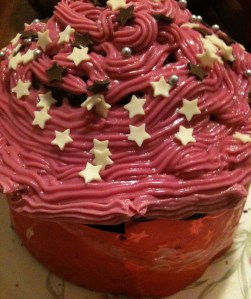
Jumbo cupcake

I bought a jumbo cupcake mold last summer (well behind, the curve I know) but have yet to share a recipe worth blogging about. My first attempt was a rather bigger disaster than this one, which involved the cupcake overspilling the mold in disasterous propotions.

Reading other comments online I found a pretty easier recipe and adapted it to suit my mold. Here is a taster picture of the result and I will share my recipe shortly.

Christmas wrapping paper was used to disguise the poor baking

Happy Baking,

Love

Miss Trays xx

Xmas tree cupcakes

Just to wet your appetite I’ve going to post a picture of the delightful xmas tree cupcakes that I made earlier this week………

Xmas tree delights

……recipe to follow.

Miss Trays xx

Snow time

With 10 inches of snow here in the valleys, I can’t make it out of my drive let alone out of the town, which has been perfect timing for me to share some of recent baking ‘masterpieces’. I have been a busy little baker, cooking pudsey biscuits for children in need, gingerbread christmas cookies for my nephew’s xmas party and an abundance of cupcakes for charity bake sales in work.

First up was children in need and armed with my Pudsey cookie cutter and a novice baker friend, I set about creating brightly coloured spotted cupcakes and crunchy pudsey biscuits.

Delicious pudsey charity biscuits

Ingredients

  • 200g Self raising flour
  • Bag of chocolate chips
  • 115g Caster sugar
  • 115g butter
  • 1 medium egg

Method

1. Preheat your oven to 180c  and grease two baking trays.

2. Mix flour, choc chips and sugar together and rub in the butter.

Rub the butter into the mixture with your fingers

3. Add sufficient egg to make a stiff dough.

4. Roll out the dough until about 7.5mm thick and use the bear cutter to create bear biscuits.

5. Place the biscuits on the baking tray and bake for 15 mins.

6. Cool on a wire rack and decorate using icing pens.

Be creative with the biscuits and add cherries, coloured icing and chocolate

I was pretty impressed with my effort until I went into work and found the below biscuits from my baking nemesis/work friend that seems to create amazing biscuits and cakes with literally no baking experience. Check out her pudsey and blush biscuits below.

Pudsey's female companion blush

Amazing pudsey and blush biscuits
Create the blush biscuits by supplementing a third of the flour for cocoa powder

Although we did make £83.00 for our efforts.

I will be posting the cupcake recipes in a few days but keep busy with the yummy biscuits.

Happy Baking,
Love,
Miss Trays xxx

Red Velvet Bonfire cake

My amazing bonfire creation

To celebrate Guy Fawkes night, I found this delightful recipe in my all time favourite bakery book, Gorgeous cakes by Annie Bell.

Ingredients

  • 120g butter
  • 300g golden caster sugar
  • 2 large eggs
  • 300g sifted plain flour
  • 230g buttermilk
  • 1 teaspoon sea salt
  • 1 teaspoon vanilla extract
  • 20g sifted cocoa powder
  • 1/2 teaspoon (approx.) red food colour paste
  • 1 tablespoon white wine vinegar
  • 1 teaspoon bicarbonate of soda

Icing

  • 120g butter
  • 100g icing sugar
  • 300g full fat cream cheese
  • 1 teaspoon vanilla extract
  • 2 x 150g boxes matchmakers

Method

1. Cream the butter and sugar in a food processor until light and fluffy.

2. Add the eggs, one at a time, scraping down the sides of the bowl between each addition.

3. Now add the flour in three goes, alternating with the  buttermilk, beginning and ending with flour.

4. Add the salt, vanilla extract and cocoa.

5. Add the food colouring a knife tip at a time until the mixture is a dramatic dusky red: it needs about 1/2 teaspoon in all.

6. Mix the vinegar and bicarbonate of soda together and add to the batter.

7. Spread the mixture evenly between two cake tins and bake for 20-25 minutes at 170c fan/gas mark 5.

To make the icing

8. Cream the butter and icing sugar in a food processor then blend with the cream cheese and vanilla extract.

Creating the bonfire

9. Stack the three sponges on top of each other and with a bread knife carve the stack into a cone, starting about an inch from the centre, to make the shape of a tall bonfire. Stack the remaining pieces on tops to create more layers.

Cake stack

10. Separate out the layers again, spread 2-3 tablespoons icing over the base layer using a palette knife, top with the middle layer and smooth over 1 1/2 tablespoons, then lay the top in place.

11. Coat the sides of the cone with the remaining icing.

12. Then stack the chocolate matchsticks upwards towards around the outside, breaking them in half towards to the end to fill the gaps.

13. Dust the whole cake with cocoa and marvel at your creation.

Happy Baking,

Love,

Miss Trays xxx

Create your own bonfire

Just in time for Guy Fawke’s night, I made this delightful little masterpiece complete with ‘twigs, ash and flames’. Here’s the inspiration photograph and I will follow with the recipe shortly.

Happy Baking,

Love,

Miss Trays xx


Perfect served warm with a mug of tea

Instead of the gleeful joy that I normally receive when bringing in my baked goods for willing participants to try, this week I got ‘not another cinnamon and nut one’. Which actually was a valid point as my most recent dishes of eastern european/scandinavian origin have either had cinnamon, nuts or both in them, either way I was on to another winner with this recipe.

Ingredients

Method

1. In a small bowl, dissolve yeast in the warm water and let stand until creamy, about 15 minutes. Zest and juice the lemon; set aside for later use.

Wait for the yeast to rise

2. In a large mixing bowl, combine the yeast mixture , milk, butter, salt, 100g sugar, eggs, lemon zest and 1/2 of the flour. Stir until smooth and well combined. Mix in the remaining flour a little at a time, stirring well with each addition.
 

Blending creates a smooth, runny mixture

 3. When the dough has come together, turn it out onto a lightly floured surface and knead until smooth and satiny; about 8 minutes.

Keep adding flour at this stage to stop the mixture becoming too runny

4. Lightly oil a large bowl, place the dough in the bowl and turn to coat with oil. Cover with a damp cloth and let rise in a warm place until doubled in volume; about an hour.

I found it easier to rub the dough with olive oil

5. Punch down the dough and turn out onto a lightly floured surface. Roll the dough out into a rectangle approximately 30 x 60cm.

The thinner you roll the dough the better, mine was slightly too thick

6. In a small bowl, mix together the cinnamon, remaining sugar and pecans.

I couldn't find chopped pecans, so pulse whole pecans in the blender

7. Spread this mixture evenly across the dough.

Spread evenly for a longer swirl centre

8. Roll the dough into a long roll and press the seam closed. With the seam turned downward, seal the two ends together to make a ring. Use a little water to help you seal the ends.

Try to make the ends an even thickness, mine were a little thin

9. Place on a lightly greased baking tray. Using a sharp knife or kitchen shears, make cuts every inch or so along the ring, cutting only three quaters of the way through. Twist each piece slightly so that the rolls fan out from the centre of the ring.

Make even cuts along the roll

10. Cover the roll with a damp towel and let rise in a warm place until nearly doubled in volume, about an hour. Meanwhile, preheat the oven to 190C/gas mark 5.

11. Bake the tea ring for 25 to 30 minutes or until golden. Remove the ring from the oven, place on a rack to cool.

Baked to perfection

12. Place the lemon juice in a small bowl along with the vanilla. Add 1/2 of the icing sugar and stir until the sugar is dissolved. Continue adding icing sugar, 1 tablespoon at a time, until the mixute is fairly thick but still pourable. Drizzle the icing over the cooled ring.

Drizzle the lemon mixture onThe finished result!

Serve and enjoy!

Complete with swirl

What I thought: ‘This cake was again delicious but took absolutely ages to make. The original mixture was quite runny and so required alot of flour to make the dough more workable. I would suggest cutting down on the amount of water used at the yeast stage and rolling out a bigger base for the dough in order to have a bigger swirl in the centre. Very enjoyable and definately something that I would make again.”

Happy Baking,

Love,

Miss. Trays  xxxx

Five layers of deliciousness

I found this sweet little cake on a blog and couldnt resist creating it’s ‘sunshine like’ taste. My version looked nothing like the original but was still a hit at our Macmillan coffee morning. Check the blog for more information about the cake and it’s origins.

Ingredients

Cake ingredients:

  • 2 cups hot honey
  • 4 cups four
  • 1 tbsp lard
  • 4 egg yolks
  • Stiff meringue from 6 egg whites
  • 2 women’s handfuls of raisins
  • 2 tbsp cinnamon
  • A little bit of cloves
  • 2 tbsp baking soda (seems like a lot)

Cream Filling:

  • 6 tbsp of superfine flour
  • 2 cups whole milk
  • 1/2 cup sugar
  • 1  & 1/4 cups butter
  • 2 packets vanilla sugar  (1/4 cup)

Steps:

1. Mix the hot honey together with the flour

Melt the honey on the stove

2. When cool, add in the lard, egg yolks, cloves, baking soda and cinnamon

Mix the ingredients together

3. Fold in the beaten egg whites

Fold in the egg whites to create air in the mixture

4. Pour into a pan the depth of 1 thick finger to the first knuckle (do this 5 times)

5. Bake each layer for a few minutes (around 3-5 min) – be careful not to over bake (you will find the cake somewhat dry).

Layer 1 baked to perfection

Steps to make the cream filling:

  1. Mix flour with a little bit of milk

Whisk the milk and flour together

 2. Boil the rest of the milk

3. Add flour mixture to hot milk, then cook until creamy consistency.

It looks like and has the consistency of custard

4. To hot cream add sugar and vanilla sugar

5. Whip butter to a “frenzy”.

Blend the butter to get rid of lumps

6. Add cream mixture to the frothy butter, blend


Once the layers have been baked, follow these steps:

  1. Starting with a cake layer, spread on some of the cream filling liberally

First layer of cream added

2. Add another cake, then more cream filling

Second layer added

3. Repeat these steps until you have spread cream on the 4th layer  of cake.

Pile the layers up and pour the cream on

4. For the fifth cake layer, crumble it in a food processor

Overnight the cream will sink into the layers

5. Spread the crumbs on top of the cream filling

Pulse the final layer in the blender

6. You can drizzle chocolate (melt chocolate with some butter, a little water together), honey or toasted and chopped walnuts on top

7. Let the cake sit, covered in the fridge, for at least 6-8 hours so that the cream seeps into the cake.

What I thought: “Using only one caketin meant I was cooking for hours. This cake seemed a little too hard to taste like sunshine but was definately an interesting taste and went down well at the macmillan coffee morning. A bit sticky and the cream was too runny so I would suggest cutting down on the amount of milk used in the recipe.”

Happy Baking,

love,

Miss Trays xxx

The poor quality photo doesn’t do this Swiss treat justice

I don’t know much Swiss cooking but this cake looked particularly interesting and not too hard. It was pretty easy to make and was delicious served warm with the remaining cream.

I found a pretty easy looking recipe.

Ingredients

  • 485 g (17 ounces) sugar
  • 250-300 g (9-10 ounces) shredded walnuts
  • 2 dl (6.8 fl. ounces) cream
  • 375 g (13 ounces) white flour
  • 220 g (8 ounces) margarine
  • 1 egg
  • 1 pinch of salt

Method

Filling:

  1. Put 335 g (12 ounces) sugar in a frying-pan, fry slowly until the sugar starts to foam. Do not stir, because the sugar will get lumpy.

    Sugar melting away

  2. Add the walnuts, mix well and remove from the heat before the sugar gets too brown.

    Adding the walnuts to the dissolved sugar

  3. Add the cream immediately and let it boil down.
  4. Let cool down the filling.

Dough:

  1. Mix flour, margarine, the rest of the sugar (150 g equals to 5 ounces), the egg and the salt and make a dough.
  2. Cut the dough into three pieces, two of the same size and one slightly smaller.
  3. Roll the two pieces of the same size to make up a bottom and a top of the cake in a form with 28-30 cm (11-12 inches) diameter.
  4. Form a roll with the third piece and place it on the bottom along the form, see figure below.
  5. Pour the filling evenly on the bottom.
  6. Cover the cake with the top.
  7. Bake in the oven at a lower level at about 200°C (400°F) for 40-45 minutes.
  8. Open the form immediately after removing from the oven to prevent the cake from sticking to the form.

[ How to form the cake from the three pieces of dough ]
  • Put bottom into the form
  • Use the ring of dough to form the back of the cake
  • Pour the filling on the bottom so that it is level to the top of the back
  • Cover the cake with the top

What I thought: “This recipe was very easy to make and turned out to be deliciously different. The ‘dough’ seemed to be more like sticky cake batter and was therefore very difficult to roll and put into the form. I would suggest adding more the required flour to firm up the mixture and make it more malleable to use. The cooking time suggested was also way to much and the cake burnt slightly. Not your typical cake and certainly a delightful treat to accompany a coffee.”

Serving suggestion: Great with the remaining cream

The taste test:

Tony, Caerphilly: “Delicious, marriage matieral bakery”

Tracey, Bristol: “Amazing, really tasty and like nothing I’ve tried before”.

Happy Baking,

Love,

Miss Trays x